Easy Stone Fire Pit For Your Backyard
Article by Lizzie West, adapted from Youtube
Hanging out in the back yard with family or roommates right now is not ideal during the daytime. But once twilight hits, it’s a little more reasonable outside to spend a little time outside of your house, playing games, talking, or listening to music together. A fire pit really takes the outdoor atmosphere to the next level – not to mention the marshmallow roasting possibilities. And it will continue to be a centerpiece for socializing well into the cooler months coming up.
Sure, you can buy a pretty nice one outright, but that will run you anywhere from $200-$2,000 out of pocket. Even purchasing a kit can cost up to $1,000, and I’m not about that life. I want to have a few bucks left over to buy those marshmallows I was talking about. I think by now, it’s pretty apparent that I like to figure out a good way to create or recycle something to meet my need. So, I headed to the internet and watched a few videos for inspiration. After watching several, I took a few tips and tricks from them all and chuckled at a few DIY dad jokes along the way. The other cool thing about building my own is that I get to decide things like, how big it is, how tall (taller = $$$), and even what color stones. You can even choose a round or squared construction. I opted for round because it seems easier, less expensive, and more inviting to gather around. And now to work on building this backyard fire pit.
Tools:
Shovel
Gloves
Level (optional)
Mallet (optional)
Wheelbarrow or some method to move dirt/grass (optional)
Short 2×4 (for spreading/leveling, also optional)
Materials:
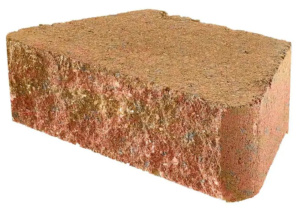
Retaining Wall Blocks (36 for a 3 tier pit, 12 for each tier-see example below)
1 bag of sand
1 bag of pea gravel
1 bag of decorative rocks (lava rocks are great, they offer some porous drainage to your pit and are inexpensive)
1 steel fire ring (optional) (THIS one is acts as a fire pit or a planter and it very reasonably priced)
Start by selecting your location for the fire pit. It’s important to see if there are any local regulations on distance from your home, but err on the side of caution and try to keep it about 20 feet from your actual residence.
 Put on your gloves before handling the blocks. This will help prevent injury. Map out the footprint of your fire pit by laying down one level of stones in a circle. Use your shovel mark around that area, this is what you will be digging out. More the stones out of the way and dig the grass and a little under it out of the circle you created. You may have some bare areas of your lawn you can fill in with this grass. Or if you have a bare area that doesn’t grow grass, you may be able to simply take a little out of that area and use it to build up the ground around it. Either way, the point of this step is to create a clean canvas to start from.
At this point use your 2×4 to roughly level out the area before adding the bag of sand. Once you empty the bag of sand into your circle, use the 2×4 to roughly level it out. You can always shift some of it around later as needed.
Now, Lay your first level of blocks. Make sure they are all evenly spaces and there aren’t really any major gaps. At this point you can either use your level or eye-ball it and make sure your blocks are all at the same level, use your mallet to gently tap any blocks into place that aren’t cooperating. If you need to move some sand to help get these as level as possible, now is your chance. You will also want to check that your steel fire ring fits well, but snugly into the opening you created. If not, use the mallet, or your feet to tap the blocks into place. Then, remove the fire ring. Using the fire ring is optional but can add life to your fire pit if you are willing to accept the extra cost.
Once you are satisfied with the first level of blocks, add the second level but place them offset to the first level, so the blocks are staggered, creating a brick-like pattern. This is important to add stability to your fire pit and it helps with some aeration. When placing each tier, double check the fit of the fire ring, if you choose to use one.
Now, add the third layer, continuing to place your blocks offset to the previous tier. We decided to stop at the third tier, but you could add a fourth if you like.
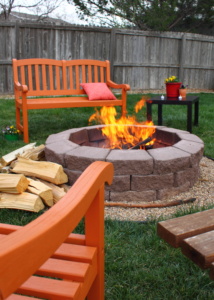
At this point, you will place your fire ring and make sure all the blocks fit well around it. Once you’re satisfied with the fit, you can place the pea gravel inside the fire pit and level it as much as you can. After this looks good, add the decorative rocks as the final layer. It will also help filter the ashed from your fires.
Your fire pit is now complete. There are a lot of other accessories that you can add later. This is another reason we went for the round pit, as there are more accessories readily available from vendors like Amazon, etc. You can purchase a lid to prevent things from getting into your fire pit when it’s not in use. You can also opt for a grill grate that will fit nicely on top for evenings you want to get rustic with dinner or want to avoid those marshmallow from falling into the fire.
Always be cautious and practice fire safety when using your fire pit and enjoy some time outdoors with your loved ones with your expert level of ambiance. Lastly, now you can brag to all your friends about how you built this awesome fire pit in your yard! Enjoy!

