A Sensory Toy Hack &
An Easy Holiday Craft
Article + Photos by | Lizzie West
You probably have a million things planned for the upcoming holidays but you still might need just one more thing to keep the kids busy while you’re baking a dessert for the next holiday potluck. We have an easy hack that you might just have everything you need already in your home!
Total Time: 15 minutes
Materials:
-1 Gallon Ziplock
-Wide Tape (Duct, Painter’s, Clear packing, etc)
-Sharpie
-Gold paint pen
-Aloe Gel
-Food Coloring (Optional)
-Buttons, sequins, or beads – anything colorful and fun to put in the gel
-Rubbing Alcohol (maybe) and paper towel
Directions:
- Prepare your bag by using the rubbing alcohol and paper towel to remove anything on there already. For example, some bags have a place to date or label the contents and this is easily removed. We added some clear packing tape on the sides and bottom of the bag to add a little more structure so the bag wouldn’t leak.
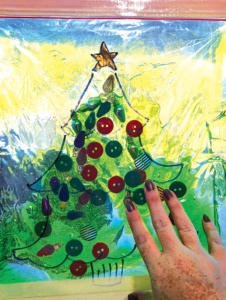
- Draw a simple shape on the bag. We chose a Christmas tree and added a star on top. We used the gold paint pen to fill it in. You can always skip filling it in if you are including a fun item in the gel to use as a “tree topper”. Let it dry for a couple minutes.
- Prepare your gel filler. We bought green aloe gel because we knew we were making a tree, but feel free to use clear gel and add whatever coloring you want to it that makes sense. In full transparency, we added a little extra green coloring to make it pop more, but that is optional and the kids are likely to have just as much fun without it. You could even add glitter if you want. You’ll want between 1/2 and 2/3 cup of the gel. Add whatever coloring/glitter you want and then put it in the bag.
- Add all your baubles and bits to the bag (beads, buttons, beans, sequins, etc) and then close and seal the bag. We added more clear tape to seal up the top.
- Use duct tape or packing tape to secure the sensory bag to an accessible window or wall and it’s ready to play with!
You can make a few different varieties pretty easily and let the kids switch between them. You can also let the kids help make the toy by drawing their own shape on the bag or helping to add in the baubles before sealing the bag. Some other fun shapes they can try are a snowman, present, wreath, Santa, or a menorah, depending on how you celebrate the holidays. You can use these for other holidays too – think how fun turkeys or monsters might be.
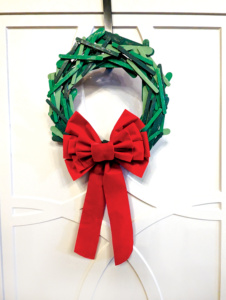
Here’s an easy holiday wreath that you can make with your children or grandkids this season. Some parts are very kid-friendly, but you might want to leave the hot glue portion to the grown-ups! Feel free to switch up the color palette to make your own holiday décor. Also consider making wreaths for different holidays, too.
Prep Time: 1 hour
Assembly Time: 30 minutes
Total Time: 1 Hour 30 minutes
Materials:
–Wreath Form (we used a wire form, but feel free to get a flat foam form if you prefer)
–Hot Glue gun and Glue Sticks (We like the extra
–A bow or ribbon to make a bow
-Two sizes of craft sticks (we got enough for 2 wreaths – about 25 large and 50 small for each wreath)
–Acrylic Paint or washable markers – 3 or 4 shades of paint or markers, we used shades of green
–Foam paint brushes (if you are using paint)
–Optional: Acrylic Glitter Paint and regular non-toxic glue like Elmer’s
-Something to protect your work space, we used a large garbage bag
Directions:
- Lay out your craft sticks and start painting or coloring them on one side. Try to have about equal numbers of each of your 3 to 4 shades of green (or whatever color you chose). Let those dry completely. This is the messiest part for the kids so you might want to have aprons or grubby clothes for them.
- Heat up your glue gun in a safe location away from tiny, curious hands. Starting with the larger craft sticks, hot glue them to the back (flatter) side of the wreath form. It helps to create a base layer that the other layers of craft sticks will stick to on top. We used about 8-10 of the larger sticks for this step.
- You can let the kiddos hand you one stick at a time, taking turns, while you glue them into place. There is no real pattern to this part – just start adding layers of different colors. Eventually, you should see very little of the form or anything behind it. You can stop when you feel like the wreath looks full enough for your liking.
- If you want to give the kids a little more control, you can do the base layer of the larger sticks and then let the kids use regular non-toxic glue to place the other sticks. This will take much longer to dry and add about another hour to the whole project.
- Optional glitter: Once all the sticks are glued into place and stable you can dry brush some acrylic glitter paint onto a few places on the wreath to make it sparkle. If you chose shimmery paint for the craft sticks, you can skip this step, too.
- Place your bow. You can either use a wire and twist it around to the back of the craft stick wreath or hot glue it to a specific part of the wreath.
- You’re finished – Hang it up and marvel are your family’s creation!


