DIY Budget Platform For Your
Front Loading Washer And Dryer
Article by Lizzie West
There have been some big appliance sales lately and I bet some of you bought a new washer and dryer. They’re probably fancy and have Wi-fi and all that jazz. However, you may not have wanted to splurge on the pedestals that are advertised to “go with” your new set of appliances, or maybe the 12 inches of height they add doesn’t fit in your space. Yep. That was my major dilemma. That. and I’m a frugal person to the core. So, I thought to myself, “Self – you can build something instead and save some much needed coin.” I thought for a while on how this would work and what would be the best and nicest looking option. I’m not an expert, but I’m happy to share what I did, as well as a few things I learned along the way.
We (my hubby and I) decided on building a platform to put under both the washer and dryer. We didn’t want to make it complicated and we didn’t need the 12 inch boost a typical pedestal provides. I figured 6-7 inches would help save my back without running the risk of being too tall to fit under the cabinets above. If you want to make it higher, it’s a simple adjustment to your materials list. Let’s get down to what materials you need.
Materials:
(2) 2in x 6in x 10ft lumber
(1) 3/4 inch plywood – 4ft x 8ft
(30-40) 3 inch wood screws
Paint (in your desired color, we went with white to match our appliances)
Carpet squares (in your desired color, we went with black to match our decor)
A buddy to help hold things in place so everything lines up properly.
Other tools needed: drill, tape measure, paintbrush, square, level, utility knife, and circular saw. Also, furniture movers and wood putty (optional).
(If you want a taller platform, order wider pieces of lumber – for example 2in x 8in or 2in x 10in – though I would add additional perpendicular cross bars as well if you opt for a taller platform to ensure adequate support)
Before buying anything, measure and measure again. Measure the total space your washer and dryer occupy and add a couple inches in each direction. You can measure the footprint based on where the feet of the appliances are, but I thought it looked more aesthetically pleasing to measure the space based on the total footprint of the appliances as a whole. We decided on 56 inches x 32 inches. As it turns out, I probably could have gone with a less deep platform (perhaps 30 inches), but I am pleased with how it turned out. The only thing this affected was how I laid the carpet squares.
*Side note 1* Be sure to note where all the valves and the dryer intake are on the wall so you don’t end up hitting those. We almost had a disaster but luckily our dryer intake was far to the side and didn’t affect the placement of our platform.
Here’s where I messed up. I ordered all my materials online from Lowe’s (except the carpet squares). That isn’t where I went wrong. It was when I went to pick up a lot of very large pieces of wood in my SUV. Curbside pickup is great. Except, the lumber didn’t fit and that was pretty embarrassing. What I already knew but didn’t think to do, was call ahead and ask them to pre-cut all the pieces for me to my specifications. It is risky, but this would have been the smartest option. It would have saved time in the building process later on, as well as allowed the materials to fit better in my vehicle. If you can, definitely ask them to pre-cut everything and cross your fingers they’re as exact as you would be. If they can’t or won’t – borrow a friend’s truck.
I got home and the hubby and I diligently measured and re-measured all the cuts. We used a square to be sure all the pieces would fit nicely together. This is where everyone needs to know that a 2×6 isn’t actually 2 inches by 6 inches. It’s actual size is 1.5 inches by 5.5 inches – check your home improvement store for their measurements. This is important when cutting the end pieces and cross bar. We cut two pieces of the 2×6 to a 56-inch length. The end pieces will be attached inside either end so they aren’t visible from the front, making a cleaner visible line and the cross bar in line with the end pieces in the middle of the framework. We knew we needed the depth to be 32 inches and needed to account for the thickness of the front and back piece when figuring out the length of the end and cross pieces. Each one really was 1.5 inches deep. Since there are two, we subtracted 3 inches from the total we needed to cut for the cross pieces (that’s 29 inches for the math whizzes out there). We cut three 29 inch pieces. Also, we made sure all the pieces of the same length actually were the same length by laying them side by side to check our accuracy.
We screwed together the framework from front to back, attaching the end and cross pieces, making sure they were square when screwing them into each other. Then we attached the back piece as well. We hit a small snag here.
*Side note 2* Be sure the wood IS NOT warped! Ours was a bit warped so it took a lot of effort to get the pieces to really butt up against each other in the frame.
Here is another part that we really could have made easier for ourselves. We measured the framework and tried to draw it out on the plywood and cut out our top piece. We ended up completely disregarding this outline and simply lined the framework up with the edge of the plywood and traced the outline of the framework to cut out the top so it would line up better.
After cutting that out, we screwed the top to the framework, using the square to line up the screws along the center support beam that we couldn’t see. We ended up using about 32 screws total for our platform. Use whatever you feel is necessary. Here’s where I took over.
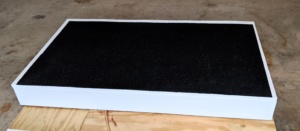
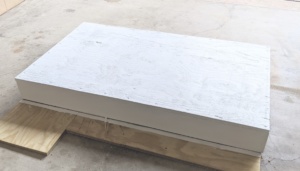
At this point it looks good. It’s not perfect, though, since we aren’t experts, so I used the wood putty to fill any screw holes or gaps in the front to give the platform a smoother look. After it dried, I painted it. Luckily I had some leftover semi-gloss white paint I had purchased for some shelves. It’s important to point out that flat paint will hide more imperfections if things didn’t line up how you wanted. I placed the platform onto the leftover plywood, so I wouldn’t end up painting the garage floor, and rolled on the paint. I ended up painting the whole thing, but you don’t have to paint the middle of the top if you add the carpet squares like I did. A paint sample should just about cover the sides and border the top. I let my paint dry overnight and first thing in the morning I laid out my carpet squares. It isn’t likely to line up perfectly, so don’t be afraid to use that square and utility knife to cut some pieces and make it fit nicely. I bought a 12 pack of 12in x 12in carpet tiles from Walmart for just under $12. (There were so many 12’s in that sentence…). I wound up with a little bit of a border around the sides and at the back of my platform. I wasn’t concerned about the back couple inches being uncovered because the feet of my appliances fit on the carpet and no one will see the back except us.
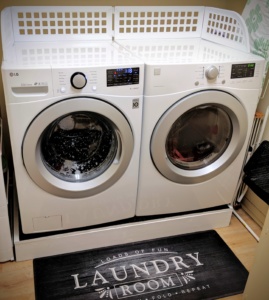
 There it is; a finished platform for my laundry room. At this point, I turned it over to my husband. Washers are heavy, so call a strong family member or friend to help place the appliances. The carpet will make placing the appliances a little more challenging, but it’s worth it for the sound dampening it offers. We didn’t do this, but considered putting furniture movers under the corners and center support beam to make moving the appliances out a little easier. This may be something that you want to do if you know you’ll need to get behind them more frequently. We don’t because I got these nifty magnetic laundry guards to prevent the odd sock from falling off the back.
Once we moved the appliances out, we placed the platform where we wanted it and the strong guys (thanks hubby and son!) lifted up the appliances and put them on top. We hooked everything back up, plugged them in, and it worked beautifully! I have to tell you – It is a WORLD of difference moving the laundry and getting it out of the dryer now. Just under 7 inches made a huge difference for us. We learned a lot and I’m happy to be the guinea pig for everyone else that would rather save a little and build their own platform rather than pay for a pedestal outright. Good luck, DIYers!

